Fitting Instruction
1) Remove dashboard
2) Open up the Dashboard (backing and the transparent plastic cover)
3) Stick double sided tape onto the back of the dial kit
4) Remove screws (usually small screws next to needles)
5) Slot the kit into place with care
6) Match the speed/Rev markings on the kit with original equipment and peel off the plastic from the double side tape that you put on the back of the dials at Step 3 and just stick it down.
7) Put the screw that you removed on Step 4 back on
8) Assemble the dashboard
![]()
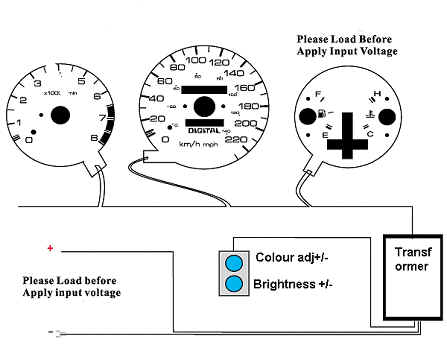
(above) The transformer and all wires and adjuster assembly
![]()
9) Connect plugs (on transformer) to the kit*
(above) picture shown the black wires ;Left, from transformer; Right, from the dial. As you can see they have male and female plugs on them. Just plug them together.
10) Connect power wires (on transformer) to the car
![]() (left):
Black wire negative, Red wire Positive
(left):
Black wire negative, Red wire Positive
10.1) Connect positive to dashboard power supple wire
10.2) Connect earth wire
Note: (1) This fitting instruction is only for reference not provided for specific model of car.
(2) If in double always consult an electrician and/or a auto mechanic.